
Your old photos, slides and video tapes shouldn’t just sit in a box! Transforming them into a family video slideshow makes for an instant priceless heirloom to pass on for generations. Going through all those photos can be a lot of work, but the process of planning out your video can also be a lot of fun.
1. Make three piles
It probably won’t be possible to include every photo or slide in your family slideshow video, so you’ll want to pick out the best.
You’ll find it helpful to designate piles such as “definitely include,” “maybe,” and “leave out.” That way if you’re unsure about some photos until you’ve seen the rest, you can go through the “maybe” pile again to make a final decision.
2. Organize
Decide the best organization strategy for what you have. This could be chronological, by family or friend group, or by event.
3. Select music
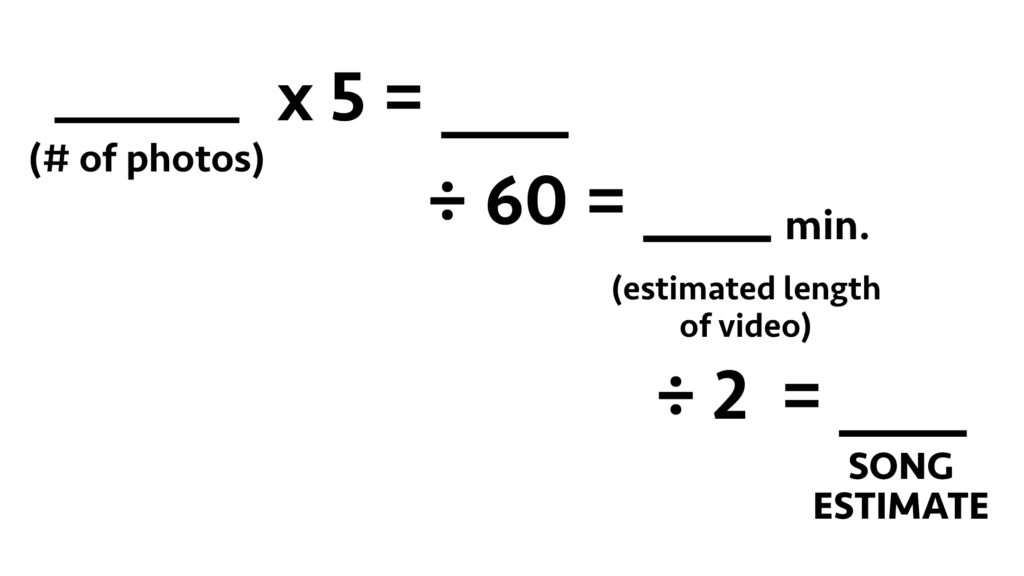
Your favorite music will make the video even more special, so select songs you love that fit well.
How many songs will you need? For a rough estimate, multiply the number of photos by five (since they’ll be on the screen for five seconds a piece), then divide by 60. This is the estimated length of the video.
Then take that number and divide by two (assuming each song is an average of about two minutes). This is a good place to start for estimating the number of songs needed.
4. Write titles
You will want to include at least one title to start the video. An example could be “family memories” with your family’s name. You may also want to write additional titles and divide the video into sections where a title begins each section. These titles could even include quotes or sayings.
5. Number each photo or slide
Once your photos are in order, keep them that way so they appear in the video in the order you intend. Number each photo using sticky notes or write on the back with a pencil – not a pen – to avoid possible damage from ink.
Once your photos are organized they’ll be ready for scanning and creating a video that will become a treasure for years to come.
